As the holidays draw closer and closer, stores are getting more and more crowded, and of course, many have put off their Christmas shopping until the very last minute. Why not avoid the mall rush this holiday season and make a personalized do-it-yourself snow globe to gift to those closest to you? This is also a perfect opportunity to put of those cell phone photos that you've been snapping to use!
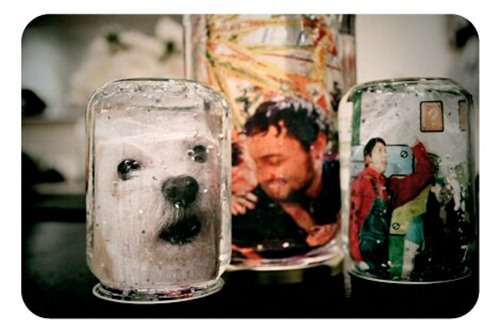
What You'll Need
- Photo or transparency—you'll want to print it in a size that is half an inch smaller than your bottle or jar's width/diameter and height.
- A glass jar or bottle (I used spaghetti sauce and baby food jars for mine).
- Glitter and/or sequins.
- Light/clear corn syrup.
- Water.
- Packaging tape.

Step 1: Prepare Your Photo
For mine, I used a photo printed onto a transparency and trimmed the borders off the edges.

If you used a regular printer to print your photo, you'll want to waterproof your photo by laying it onto pieces of packaging tape on both sides. Make sure the entire surface is covered and that there are no air bubbles, so that the water will not be able to enter. Leave at least ¼ of an inch of tape around the borders. (Don't worry about this step if you are using a transparency.)

If your photo is extra wide like the one shown above, you'll want to roll it up into a tube and tape it together.

Step 2: Insert the Photo
Roll up the photo and slip it into your bottle or jar. Do this quickly to ensure that your photo does not stay rolled up. If you are using a jar, be sure that to insert the photo upside down.

Make final adjustments before you pour in the water and corn syrup. The photo should fit nice and snug inside the bottle or jar.

Step 3: Time for the Magic Concoction
Fill over half the jar or bottle with water and the rest with corn syrup. Add glitter and/or sequins as desired.


Tighten the lid on the jar as much as you possibly can. We don't want your snow globe leaking water and glitter all over the place!
Step 4: Admire Your Snow Globe
Flip your jar upside down to activate your new snow globe! If you used a bottle, just shake it up a bit and watch the glittery goodness fall over your photo. Enjoy!

If you made one of these, make sure to share a picture of it below in the comments to give everyone else some more inspiration!
Just updated your iPhone? You'll find new emoji, enhanced security, podcast transcripts, Apple Cash virtual numbers, and other useful features. There are even new additions hidden within Safari. Find out what's new and changed on your iPhone with the iOS 17.4 update.











9 Comments
Hmmm... I never thought of using Karo syrup!
do you tape the front AND back of the photo if its regular print?
Yes! Front and back.
You don't want the water to touch your photo at all.
What an amazing DIY gift idea! Love it.
amazing......!!!
Would it also work if the photo was laminated, too?
That's an awesome Idea. I made one once when I was in elementary school. I was wondering would it work the same if you used glycerol instead of the corn syrup? Will it last the same/longer? Thanks!
You say to fill over half the jar... do you mean about 3/4 or can you give me a better idea of the ratio?
Martha Stewart's site says to use distilled water and a dash of glycerin, (available at drug stores) Not too much, as the glitter will stick to the bottom.
Share Your Thoughts